
Sure Fit Designs
Pants Front Crotch Fit
Removing the horizontal fold beneath the tummy — a precise pattern adjustment for a cleaner, more comfortable fit.
Understanding the Problem
Some women experience horizontal fullness or bagging directly beneath the tummy and just before the crotch curve begins. Once you’ve sewn your test muslin for your pants, if this is occurring, you will find one suggestion for a minor tune-up on page 12 (#1) of the Pants Kit Instruction Book. This may be a satisfactory refinement for you.
Another alternative is to remove this fold of fabric at CF. Follow these step-by-step directions.
Step-by-Step Adjustment
Step 1. To determine how much you need to remove, pinch out the fabric in a tiny fold. If you pinch out ¼” (.6cm), this will mean that you will be totally removing ½” (1.3cm).
Close-up of dart/tuck wedge from CF going to nothing at the side seams.

Step 2. Mark this level location on CF of the crotch seam. Draw a perpendicular line (to the grainline) over to the side seam. Mark point A and B.
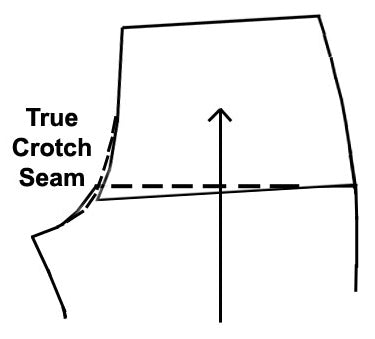
Step 3. Cut from CF to side seam, leaving a small hinge of paper at the side seam. This will act as a pivot point. Secure the pivot point with plastic tape.
Step 4. Overlap the CF seam the amount you require, thereby creating a small horizontal dart or tuck which begins at CF and goes to nothing at the side seam.
Step 5. True the CF crotch seam.

Step 6. The more you overlap at CF, the more the waist edge tilts down and angles the CF seam. To maintain the original orientation of the upper CF seam, when you true the crotch seam, you will be creating a narrow wedge as indicated by the green arrow. (The blue line indicates where CF at the waist edge originated).

Step 7. Cut/remove this narrow wedge and tape it back in place at the side seam waist edge. This will maintain the correct waist circumference and true the side seam shape so that it will sew in the same curve to the back side seam.

Step 8. Redraw and reposition the front hip-fitting dart to best suit your body contours.
Step 9. Bring the straight of grain up from the leg.
Important Note
This process will shorten the CF crotch length by the amount of the dart/tuck. Be aware that you may need to add this amount on to the back crotch length so that you maintain your overall crotch length requirement.
Return to the Learning Center to explore all fitting guides, videos, and sewing resources.
Back to Learning Center